 Boiled Artichokes and Bruschetta (my way)
This meal is one that has no meat, but once in a while its nice to have a meal that doesn't revolve around meat and potatoes. Surprisingly the artichokes are very filling, however for the first time you might want to add one other appetizer with it to be on the safe side. This meal is enough to easily fill us. I have lots of pictures so I'm going to try to be as thorough as I can.
For the Artichokes You'll need:
Whole artichokes (1 per person) garlic, olive oil, fresh herbs of choice
 First thing is first, get your water started boiling. You'll need a pot large enough to allow your artichokes freedom of movement while boiling, so get that water started before anything else.
Cut the thorns off the artichokes! This is an important step and one you'll only forget once! They aren't called "chokes" by accident. Use scissors to cut the tip of each leaf off and then use a sharp knife to slice off all of the top portion at once.


Next cut off the bottoms so that they sit even as pictured below.

Once the water gets boiling, add olive oil, about 2 turns = 2 Tbsp. should do it add minced garlic, I've shown in pictures the best way to get the skin off the garlic, chop, then mince it. So here ya go:


Put the clove under the knife blade facing away from you and SMASH it.


Take the skin off and discard it as I've never found a use for the skin... yet.
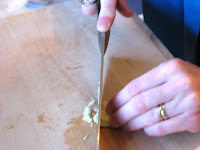

Now that its smashed its much easier to chop, then take your blade and rock back and forth the opposite direction in which you chopped. Scrape it back into a pile and do this a few more times until the garlic is minced to your liking.
Put the minced garlic clove, minced herbs of choice (I used what I have growing - Rosemary, Thyme, Greek Oregano, and Sweet Marjoram)


a pinch of salt and the artichokes into the boiling water (chokes should be bottom side down). Put the lid on and let them boil for 30 minutes - then flip them over to boil bottom side up for another 15 minutes. Once they're done (45 minutes total boiling time) take them out to a colander to strain the water out.


While they're boiling make the Bruschetta and dipping sauces for the chokes.
Bruschetta, you'll need
Italian or French loaf bread (sliced to about 1" thick), garlic clove, olive oil, diced tomatoes (I use canned sometimes when they're not in season locally since I didn't can any myself last year), fresh basil (since I didn't grow Basil this year I chose the same minced herbs I used in the boiling water with the artichokes), and Parmesan cheese.


Toast Bread then rub with 1/2 clove of garlic (toasting it first is important for this step to work). Brush with Olive Oil, put diced tomatoes fresh herbs and Parmesan cheese on and broil for about 2 minutes.


For the dipping sauces I don't have pictures, but the directions are simple.
1st one, get about 2 Tbsp. of Mayo (or that Miracle Salad Dressing it doesn't really matter) and add about 1/2 Tbsp Olive Oil and herbs as you prefer, mix it all together.
2nd one, melt butter and add garlic, Parmesan cheese to taste.
Both are used to dip the artichoke leaves in, to eat the leaves you scrape the meaty underside against your bottom teeth and discard the fibrous top part of the leaf. The "heart" is really the soft bottom that once you peel all the leaves off will be fabulous to eat but DO NOT eat the "choke" which you should be able to tell what it is as it would undoubtedly choke you!
Bon Appetite!





 Posts
Posts


